
Character Customization
Character Customization is the core feature of STPro Actor.
It allows users to create personalized human characters by selecting body types, head styles, facial features, clothing, poses, and appearance settings.
Users can build characters that match their storytelling, educational, marketing, or animation requirements.
Purpose of Character Customization
Section titled “Purpose of Character Customization”Character Customization helps users:
- Create unique actors
- Personalize character appearance
- Design project-specific characters
- Maintain visual consistency
- Build reusable animation assets
- Prepare actors for animation workflows
The customization system is designed to provide flexibility while keeping the creation process simple and efficient.
Why Character Customization Matters
Section titled “Why Character Customization Matters”Character customization allows users to create actors that fit different stories, scenes, industries, and creative requirements.
The same base character can be transformed into completely different roles by changing appearance elements such as:
- Hairstyles
- Clothing
- Makeup
- Accessories
- Skin colors
- Facial appearance
- Body appearance
This flexibility helps users create a wide variety of unique characters without starting from scratch every time.
Example
Section titled “Example”A useful way to understand character customization is to think about actors in movies.
A single actor may play different roles in different films. Although it is the same person, their appearance changes depending on the character they are portraying.
These changes may include:
- Different hairstyles
- Different clothing styles
- Different makeup
- Different accessories
- Different visual personalities
For example:
- In one movie, a character may appear as a business professional.
- In another movie, the same actor may appear as a teacher.
- In another role, the actor may appear as a scientist, police officer, doctor, student, or historical character.
The core person remains the same, but the visual presentation changes to match the role.
STPro Actor follows a similar concept by allowing users to transform characters into different personalities and roles through customization options.
Common Use Cases
Section titled “Common Use Cases”Character customization can be used for:
- Storytelling animations
- Educational content
- Marketing campaigns
- Training videos
- Explainer videos
- Social media content
- Brand mascots
- Entertainment projects
Users can create multiple unique characters that match the needs of each project.
Reusable Character Designs
Section titled “Reusable Character Designs”Customized characters can also be reused across multiple projects.
For example:
- A teacher character can be used in educational videos.
- A business character can be used in corporate presentations.
- A doctor character can be used in healthcare explainers.
- A customer character can be used in marketing scenarios.
This saves time while maintaining visual consistency across projects.
Creating a New Character
Section titled “Creating a New Character”To begin character creation:
- Open STPro Actor.
- Click Create New Project.
- Enter a project name.
- Select a character gender.
- Select a body type.
- Select a head style.
- Click Create Project.
The customization workspace opens after project creation.
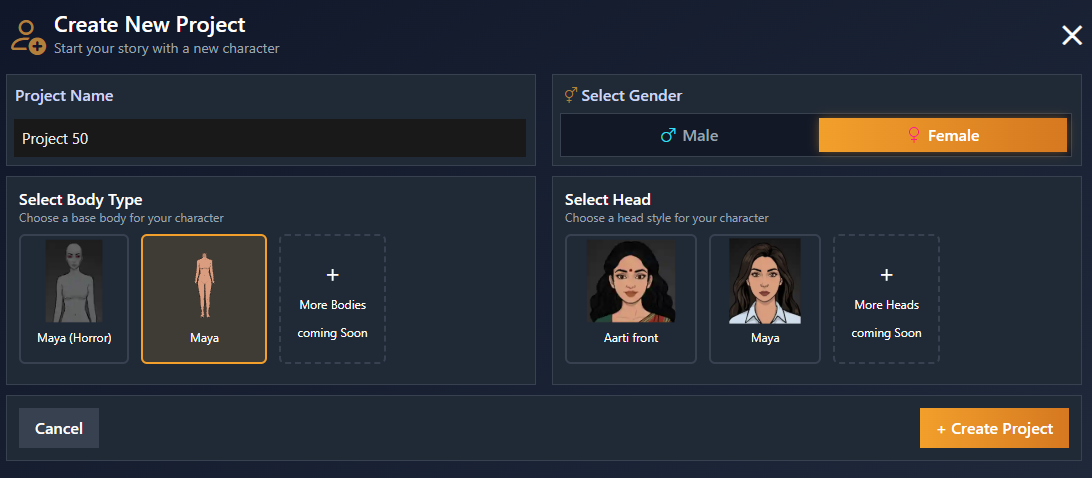
Project Name
Section titled “Project Name”Each actor project requires a project name.
The project name helps users:
- Identify actor projects
- Organize character collections
- Manage multiple actor designs
- Reopen projects later
Users can assign names based on:
- Character names
- Project names
- Story requirements
- Internal naming conventions
Gender Selection
Section titled “Gender Selection”STPro Actor currently provides gender selection during project creation.
Available options include:
- Male
- Female
The selected gender determines the available body and character configuration options.
Body Type Selection
Section titled “Body Type Selection”Before creating a project, users must select a body type.
The body type serves as the foundation of the character.
Body selection affects:
- Character structure
- Clothing compatibility
- Overall appearance
- Pose rendering
Additional body types may become available in future platform updates.
Note
The number of available body types may vary as new actor content is added to the platform.
Head Selection
Section titled “Head Selection”Users must select a head style before creating the actor.
Head styles define the character’s initial facial appearance.
Head selection influences:
- Facial structure
- Hairstyle compatibility
- Character identity
- Customization options
Different head presets may be available depending on the selected actor category.
Note
Additional head styles may be introduced in future updates.
Character Customization Categories
Section titled “Character Customization Categories”After creating a project, users gain access to multiple customization categories.
These categories allow detailed control over character appearance.
Available categories include:
- Head Customization
- Body Customization
- Clothing Customization
- Makeup
- Pose Controls
- Skin Colors
Each category provides specific tools and options for modifying the character.
Real-Time Character Preview
Section titled “Real-Time Character Preview”All customization changes are displayed instantly within the preview area.
Users can immediately see:
- Appearance changes
- Clothing updates
- Pose modifications
- Facial adjustments
- Color changes
Real-time previews help users make accurate design decisions.
Editing Existing Characters
Section titled “Editing Existing Characters”Users can reopen previously saved actor projects.
After opening a saved project, users can:
- Continue customization
- Change appearance settings
- Update clothing
- Modify poses
- Render updated versions
This allows continuous improvement of character designs.
Character Creation Workflow
Section titled “Character Creation Workflow”A typical customization workflow includes:
- Create a new actor project.
- Select gender.
- Choose a body type.
- Select a head style.
- Customize appearance.
- Save progress regularly.
- Preview the actor.
- Render the completed character.
- Use the rendered actor inside STPro Animator.
Saving During Customization
Section titled “Saving During Customization”Users should save progress frequently while working on a character.
Saving helps preserve:
- Appearance settings
- Clothing selections
- Pose configurations
- Skin color adjustments
- Other customization changes
Regular saving reduces the risk of losing work.
Note
STPro Actor does not automatically save every customization change.
Users should save their progress regularly while editing.
Subscription and Rendering
Section titled “Subscription and Rendering”Character customization is available to all users.
However, rendering customized actors requires an active subscription.
Without an active subscription, users can:
- Create characters
- Customize characters
- Preview characters
- Save actor projects
Rendering remains unavailable until a valid subscription is activated.
Note
Rendering is a premium feature and requires an active STPro subscription.
Benefits of Character Customization
Section titled “Benefits of Character Customization”The customization system provides:
- Flexible actor creation
- Personalized character design
- Reusable animation assets
- Browser-based workflow
- Professional character building tools
- Seamless Animator integration
These capabilities help users create actors tailored to their specific projects.
Summary
Section titled “Summary”Character Customization is the foundation of STPro Actor. Users can create actor projects, select gender, body types, and head styles, then continue refining the character through multiple customization categories. After customization and rendering, actors become available for use inside STPro Animator.
Next Step
Section titled “Next Step”Continue to the next documentation section to learn:
- Understanding the STPro Actor interface
- Navigation panels and controls
- Preview workspace
- Character editing layout