
Rendering Characters
Rendering converts the actor into a finalized rigged character asset.
The generated character includes the required rigging structure needed for animation workflows inside STPro Animator.
After rendering is completed successfully, the actor becomes available for animation workflows and scene creation.
Purpose of Character Rendering
Section titled “Purpose of Character Rendering”Rendering helps users:
- Finalize customized actors
- Generate usable animation assets
- Transfer actors to STPro Animator
- Store completed character designs
- Prepare actors for animation projects
Rendering is the final stage of the actor creation workflow.
What Happens During Rendering
Section titled “What Happens During Rendering”When rendering starts, STPro Actor processes:
- Character appearance
- Head customizations
- Body customizations
- Clothing selections
- Makeup settings
- Skin colors
- Pose configurations
The system then generates a finalized actor asset.
Rendering Requirements
Section titled “Rendering Requirements”Before rendering, users should ensure:
- Character customization is complete
- Desired clothing is selected
- Makeup settings are finalized
- Pose settings are reviewed
- Progress has been saved
These steps help avoid rendering unwanted configurations.
Subscription Requirement
Section titled “Subscription Requirement”Rendering is a premium feature.
Users must have an active subscription before rendering characters.
Without an active subscription:
- Character customization is available
- Preview functionality is available
- Saving progress is available
- Rendering is not available
Note
STPro Actor rendering requires an active subscription plan.
Users without a subscription can create and customize actors but cannot generate final rendered characters.
How to Render a Character
Section titled “How to Render a Character”Step 1 — Complete Character Design
Section titled “Step 1 — Complete Character Design”Customize the actor according to project requirements.
Examples include:
- Hair customization
- Clothing selection
- Makeup adjustments
- Body modifications
- Pose selection
Step 2 — Save Progress
Section titled “Step 2 — Save Progress”Click the Save button before rendering.
Saving ensures the latest changes are included in the render process.
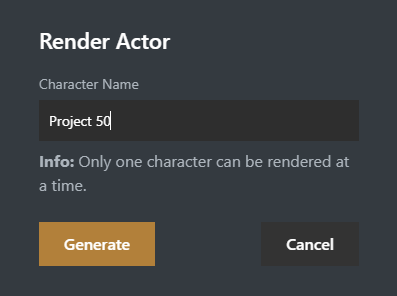
Step 3 — Click Render
Section titled “Step 3 — Click Render”Locate the Render button in the Top Toolbar.
Clicking Render starts the character generation process.
Step 4 — Wait for Processing
Section titled “Step 4 — Wait for Processing”The system processes all customization data.
Rendering time may vary depending on:
- System load
- Character complexity
- Server processing activity
Step 5 — Render Completion
Section titled “Step 5 — Render Completion”After successful rendering:
- The actor is finalized
- A render record is created
- The actor becomes available inside STPro Animator
Actor Availability in Animator
Section titled “Actor Availability in Animator”Successfully rendered actors automatically become accessible inside STPro Animator.
Users can:
- Add actors to scenes
- Animate rendered characters
- Use actors across projects
- Build complete animation workflows
This creates a seamless connection between STPro Actor and STPro Animator.
Animation-Ready Character Output
Section titled “Animation-Ready Character Output”Rendered actors are automatically prepared for animation usage.
The render process generates:
- Character appearance data
- Clothing configurations
- Pose information
- Rigged character structure
This allows the actor to be used inside STPro Animator without requiring manual rigging or additional character setup.
Verifying Successful Rendering
Section titled “Verifying Successful Rendering”Users can verify completion by:
- Checking Render History
- Opening STPro Animator
- Searching available actor assets
Successfully rendered actors should appear in the user’s available assets.
Rendering Best Practices
Section titled “Rendering Best Practices”For optimal results:
- Save before rendering
- Review all customizations carefully
- Verify clothing selections
- Check pose settings
- Confirm final appearance
Following these practices reduces the need for re-rendering.
Common Rendering Issues
Section titled “Common Rendering Issues”Render Option Unavailable
Section titled “Render Option Unavailable”Possible cause:
- No active subscription
Solution:
- Purchase or activate a subscription plan
Actor Not Appearing in Animator
Section titled “Actor Not Appearing in Animator”Possible causes:
- Rendering still processing
- Synchronization delay
Solutions:
- Wait a few minutes
- Refresh the page
- Check Render History
Missing Recent Changes
Section titled “Missing Recent Changes”Possible cause:
- Progress was not saved before rendering
Solution:
- Save the actor
- Render again
Benefits of Character Rendering
Section titled “Benefits of Character Rendering”The Rendering Characters feature provides:
- Animation-ready actors
- Seamless Animator integration
- Consistent character assets
- Efficient production workflows
- Reusable character designs
Summary
Section titled “Summary”The Rendering Characters feature converts customized actors into finalized assets that can be used inside STPro Animator. By processing all appearance, clothing, makeup, and pose configurations, the system creates animation-ready characters that can be integrated directly into animation projects.
Next Step
Section titled “Next Step”Continue to the next documentation section to learn:
- Render History
- Tracking rendered actors
- Managing render records
- Reviewing rendering activity