
Properties
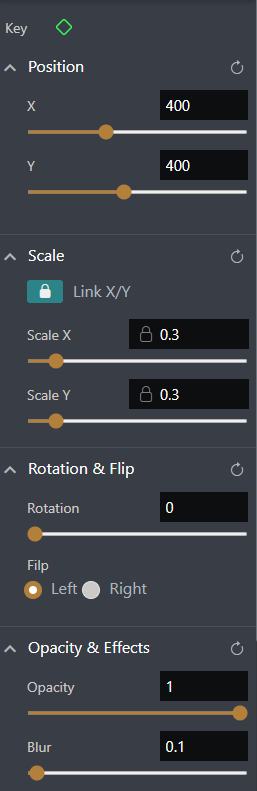
The Properties panel allows users to control how characters, props, images, videos, and other scene elements appear and behave within a scene.
Using the Properties panel, users can adjust position, scale, rotation, opacity, effects, chroma key settings, and animation speed.
The Properties panel is located on the right side of the STPro Animator workspace.
Purpose of the Properties Panel
Section titled “Purpose of the Properties Panel”The Properties panel helps users:
- Position scene elements precisely
- Resize objects and characters
- Rotate elements
- Control visibility
- Apply visual effects
- Create keyframe-based animations
- Fine-tune scene behavior
Most scene customization and motion adjustments are performed through this panel.
Accessing the Properties Panel
Section titled “Accessing the Properties Panel”To access properties:
- Select an object in the scene.
- Open the Properties tab from the right panel.
The available settings for the selected object will appear.
Supported Elements
Section titled “Supported Elements”Properties can be applied to:
- Characters
- Backgrounds
- Images
- Videos
- Props
- Audio-linked visual assets
- Imported media
Available controls may vary depending on the selected asset type.
Keyframes
Section titled “Keyframes”The Properties panel supports keyframe-based animation.
Keyframes allow properties to change over time.
Users can add keyframes at specific points on the timeline.

Properties That Support Keyframes
Section titled “Properties That Support Keyframes”The Key control allows users to animate specific property values over time.
Keyframes can be applied to:
- Position
- Scale
- Rotation
- Flip
- Opacity
- Blur
- Brightness
When a keyframe is added, STPro Animator stores the value of the selected property at the current timeline position.
During playback, the system automatically interpolates between keyframes to create smooth motion and visual transitions.
Properties That Do Not Support Keyframes
Section titled “Properties That Do Not Support Keyframes”The following controls are not currently keyframe-enabled:
- Chroma Key
- Animation Speed
Changes to these settings apply to the selected asset but cannot be animated across the timeline using keyframes.
Example: Position Animation
Section titled “Example: Position Animation”Example workflow:
- Place character on the left side.
- Add a keyframe.
- Move the timeline forward.
- Move character to the right side.
- Add another keyframe.
Result:
The character smoothly moves across the scene during playback.
Example: Fade Out Effect
Section titled “Example: Fade Out Effect”- Set opacity to 100%.
- Add a keyframe.
- Move the timeline forward.
- Set opacity to 0%.
- Add another keyframe.
Result:
The object gradually disappears.
Combining Multiple Properties
Section titled “Combining Multiple Properties”Users can combine multiple keyframed properties.
Example:
- Position change
- Rotation change
- Opacity change
- Blur effect
All changes can occur simultaneously during playback.
This enables more advanced animations without manual frame-by-frame editing.
Tips for Effective Use
Section titled “Tips for Effective Use”For better results:
- Use keyframes sparingly
- Preview changes frequently
- Keep motion smooth
- Avoid extreme property changes unless required
- Combine effects carefully
These practices help create professional-looking animations.
Position Controls
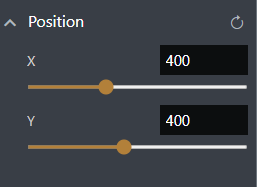
Section titled “Position Controls”Position controls determine where an object appears on the canvas.
Available settings:
- X Position
- Y Position
X Position
Section titled “X Position”Controls horizontal movement.
- Increase value → Move right
- Decrease value → Move left
Y Position
Section titled “Y Position”Controls vertical movement.
- Increase value → Move upward
- Decrease value → Move downward
Position controls are commonly used when arranging scenes and creating motion paths.
Scale Controls
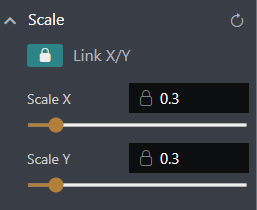
Section titled “Scale Controls”Scale controls adjust the size of an object.
Available settings:
- Scale X
- Scale Y
Users can:
- Enlarge objects
- Reduce object size
- Create distance effects
- Match scene perspective
Scaling does not modify the original asset.
Rotation & Flip Controls
Section titled “Rotation & Flip Controls”Rotation
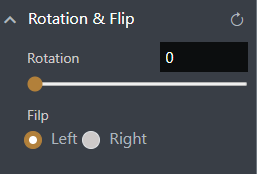
Section titled “Rotation”Rotation changes the orientation of an object.
Users can:
- Tilt characters
- Rotate props
- Adjust object angles
- Create dynamic compositions
Rotation values are measured in degrees.
Flip controls mirror an object.
Available options:
- Flip Left
- Flip Right
Common use cases:
- Change character facing direction
- Reuse assets without duplication
- Improve scene composition
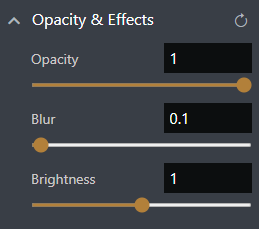
Opacity and Effects
Section titled “Opacity and Effects”Opacity
Section titled “Opacity”Opacity controls determine transparency.
Values range from:
- 0% = Fully transparent
- 100% = Fully visible
Opacity is useful for:
- Fade-in effects
- Fade-out effects
- Ghost effects
- Layer blending
Adds softness to the selected element.
Common uses:
- Background depth simulation
- Focus effects
- Dream sequences
Brightness
Section titled “Brightness”Controls overall light intensity.
Users can:
- Brighten objects
- Darken objects
- Match scene lighting
Chroma Key
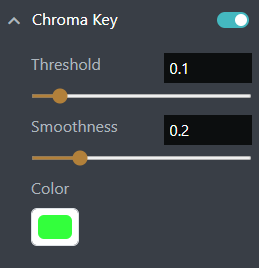
Section titled “Chroma Key”The Chroma Key feature removes a selected background color from videos or supported assets.
Common use cases:
- Green screen removal
- Virtual backgrounds
- Video compositing
- Character integration into custom scenes
Users can:
- Select a supported video asset.
- Enable Chroma Key.
- Select the key color to remove.
- Adjust chroma settings for cleaner results.
Chroma Key Settings
Section titled “Chroma Key Settings”Active State
Section titled “Active State”Enables or disables the chroma key effect.
Determines which color should be removed from the asset.
Common examples:
- Green
- Blue
- Custom background colors
Threshold
Section titled “Threshold”Controls how aggressively the selected color is removed.
Higher values remove more of the selected color.
Smoothness
Section titled “Smoothness”Controls edge blending around the subject.
Smoothness helps create cleaner transitions and reduces harsh edges after background removal.
Speed Control
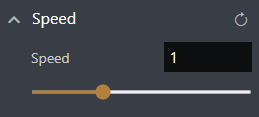
Section titled “Speed Control”Animation Speed controls how fast or slow a character animation plays.
Users can:
- Slow down movement
- Increase playback speed
- Create dramatic effects
- Match character timing with audio
Animation Speed affects the selected animation but is not currently supported by the Key control system.
Changes to animation speed apply immediately and remain constant until adjusted again.
Common Issues
Section titled “Common Issues”Property Not Updating
Section titled “Property Not Updating”Possible cause:
- Wrong object selected
Solution:
- Verify the selected asset
- Apply changes again
Keyframe Not Working
Section titled “Keyframe Not Working”Possible causes:
- No keyframe added
- Timeline position incorrect
Solution:
- Add a keyframe
- Check timeline location
Object Appears Invisible
Section titled “Object Appears Invisible”Possible cause:
- Opacity set too low
Solution:
- Increase opacity value
Benefits of the Properties Panel
Section titled “Benefits of the Properties Panel”The Properties panel provides:
- Precise scene control
- Visual customization
- Motion creation tools
- Keyframe animation support
- Advanced object manipulation
- Professional animation workflows
Summary
Section titled “Summary”The Properties panel is the primary control center for object transformation and visual adjustments in STPro Animator. Users can modify position, scale, rotation, opacity, effects, chroma key settings, and animation speed while creating keyframe-based animations that bring scenes to life.
Next Step
Section titled “Next Step”Continue to the next section to learn about:
- Animation categories
- Applying animations to characters
- Character movement controls
- Expression and action animations
- Animation workflow inside STPro Animator