
Props
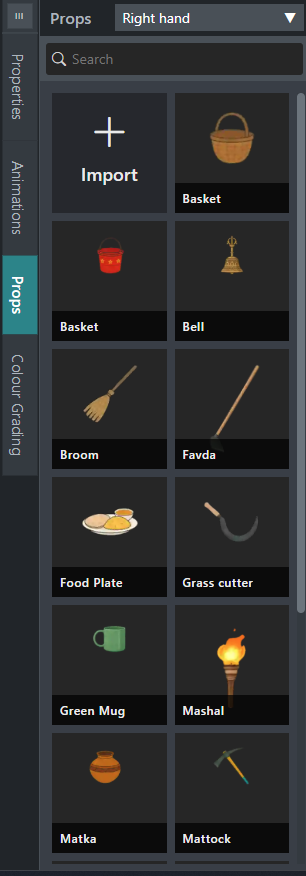
Props are objects and accessories that can be added to scenes to improve storytelling, realism, and visual engagement.
STPro Animator provides a collection of props that users can place inside scenes alongside characters, backgrounds, and other assets.
Props help create more detailed and meaningful animations.
Purpose of Props
Section titled “Purpose of Props”Props allow users to attach accessories and additional visual elements directly to specific parts of a character.
They help users:
- Personalize characters
- Add accessories and wearable items
- Enhance character appearance
- Create unique character styles
- Support storytelling and character roles
- Improve visual realism
Props automatically follow the character and remain attached to the selected body location.
Accessing Props
Section titled “Accessing Props”To use props:
- Select a character in the scene.
- Open the Properties panel.
- Expand the Props section.
- Select a prop attachment category.
- Choose a prop from the available options.
- Adjust the prop settings if required.
The selected prop is immediately attached to the chosen character location.
Prop Categories
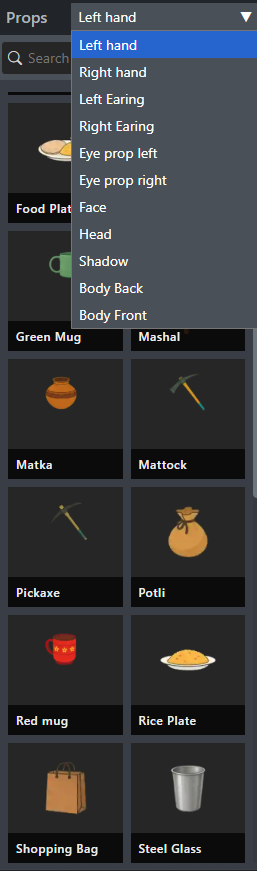
Section titled “Prop Categories”Props are organized into attachment categories based on where they appear on the character.
Available categories include:
- Left Hand
- Right Hand
- Left Earring
- Right Earring
- Shadow
- Body Back
- Body Front
- Left Eye Prop
- Right Eye Prop
- Face
- Head
Each category displays props designed specifically for that attachment location.
Selecting a Prop Category
Section titled “Selecting a Prop Category”To add a prop:
- Select a character.
- Open the Props section.
- Choose an attachment category.
- Browse available props.
- Select a prop.
The available prop list automatically changes based on the selected category.
For example:
- Selecting Head shows head accessories.
- Selecting Left Hand shows hand-held items.
- Selecting Face shows facial accessories.
- Selecting Eye Prop shows eye-related accessories.
This helps users quickly find compatible props.
Applying Props
Section titled “Applying Props”After selecting a category:
- Choose a prop from the available list.
- The prop is automatically attached to the character.
- Adjust positioning if necessary.
- Preview the result in the scene.
Multiple props can be applied to different categories simultaneously.
Example:
- Glasses on Face
- Hat on Head
- Book in Left Hand
- Bag on Body Back
This allows users to create detailed and unique character designs.
Prop Adjustment Controls
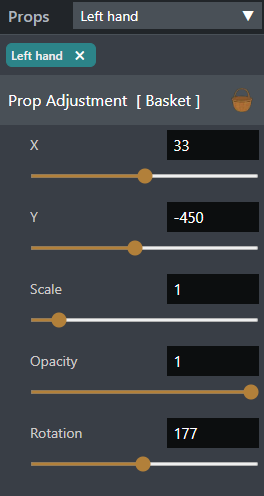
Section titled “Prop Adjustment Controls”After applying a prop, users can fine-tune its placement using adjustment controls.
Available controls include:
- X Position
- Y Position
- Scale
- Opacity
- Rotation
X Position
Section titled “X Position”Controls horizontal movement of the prop.
- Increase value → Move right
- Decrease value → Move left
Useful for precise alignment.
Y Position
Section titled “Y Position”Controls vertical movement of the prop.
- Increase value → Move up
- Decrease value → Move down
Useful when adjusting accessory placement.
Controls the size of the prop.
Users can:
- Increase size
- Reduce size
- Match character proportions
- Improve visual appearance
Scaling does not affect the original prop asset.
Rotation
Section titled “Rotation”Controls the angle of the prop.
Rotation is useful for:
- Natural placement
- Better alignment
- Character-specific positioning
Rotation values are measured in degrees.
Opacity
Section titled “Opacity”Controls prop transparency.
Values range from:
- 0% = Fully transparent
- 100% = Fully visible
Opacity can be used to create subtle visual effects and improve scene composition.
Importing Custom Props
Section titled “Importing Custom Props”In addition to the built-in prop library, users can upload and use their own custom prop assets.
Custom props allow users to create highly personalized scenes and character designs that match specific project requirements.
Common examples include:
- Company logos
- Product images
- Custom accessories
- Branding elements
- Educational materials
- Project-specific objects
- Decorative assets
Uploading a Custom Prop
Section titled “Uploading a Custom Prop”To upload a custom prop:
- Select a character.
- Open the Properties panel.
- Navigate to the Props section.
- Select the desired prop category.
- Click Import Prop.
- Choose an image file from your device.
- Wait for the upload to complete.
The uploaded prop becomes available for use within the selected category.
Layer Management
Section titled “Layer Management”Props can be layered with other scene elements.
Users may:
- Place props in front of characters
- Position props behind characters
- Organize scene depth
Proper layering improves visual hierarchy.
Character Customization Examples
Section titled “Character Customization Examples”Props can be combined to create unique character appearances.
Examples:
Teacher
Section titled “Teacher”- Glasses on Face
- Book in Left Hand
Fashion Character
Section titled “Fashion Character”- Earrings
- Face Accessories
- Head Accessories
Different prop combinations help create distinct character identities.
Editing Existing Props
Section titled “Editing Existing Props”After placing a prop, users can modify it at any time.
Possible adjustments include:
- Repositioning
- Resizing
- Rotating
- Applying effects
Changes are reflected immediately within the workspace.
Props in Animation Projects
Section titled “Props in Animation Projects”Props can be used across many animation types.
Common use cases include:
- Educational videos
- Storytelling projects
- Marketing content
- Business presentations
- Training materials
- Social media videos
Different props can be combined to create more engaging scenes.
Performance Considerations
Section titled “Performance Considerations”For optimal performance:
- Use only necessary props
- Avoid excessive scene clutter
- Organize assets properly
- Preview scenes regularly
Efficient asset management improves workflow and rendering performance.
Benefits of Props
Section titled “Benefits of Props”Props provide:
- Better storytelling
- More realistic scenes
- Enhanced visual quality
- Greater creative flexibility
- Improved audience engagement
- Professional scene design
Summary
Section titled “Summary”The Props section allows users to attach accessories and wearable items to specific character locations such as the head, face, hands, eyes, ears, and body. Props automatically adapt to the selected attachment category and can be customized using X position, Y position, scale, opacity, and rotation controls to achieve the desired appearance.
Next Step
Section titled “Next Step”Continue to the next section to learn about:
- Color grading tools
- Scene color correction
- Brightness adjustments
- Contrast control
- Saturation settings
- Creating different visual moods
- Enhancing the overall appearance of animations