
FK Animation
FK (Forward Kinematics) Animation allows users to manually create and customize character animations by adjusting individual body parts over time. It provides complete control over character movement through keyframes and transform properties.
Important: When a predefined Custom Animation is active in the workspace, the animation itself cannot be edited. Users can only preview and use the animation. To create or modify animation movements, a new FK animation must be created or remove the used custom animation from the timeline.
Opening FK Animation
Section titled “Opening FK Animation”- Select a character or vehicle inside STPro Animator.
- Navigate to the Animations panel.
- In custom animation click on Add New +.
- The FK Animation workspace will open.
The workspace consists of:
- Animation Panel
- Layers Panel
- Audio Panel
- Canvas Area
- Timeline
- Transform Panel

Left Panel
Section titled “Left Panel”The Left Panel contains the primary tools used to create, edit, and manage FK animations.
The available options inside the panel are generated dynamically based on the currently selected character, vehicle, or asset.
The panel contains three tabs:
- Animations
- Layers
- Audio
Animations
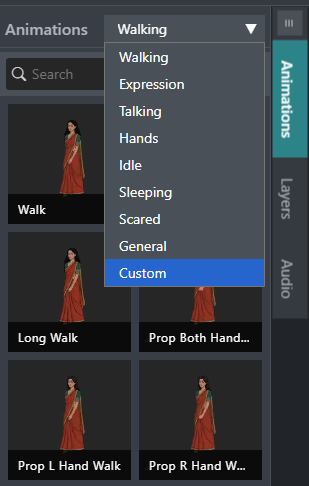
Section titled “Animations”The Animations tab displays all animation categories available for the selected asset.
FK Animation supports both character and vehicle animation workflows. The available animation categories depend entirely on the currently selected asset.
Examples of available categories include:
- Walking
- Talking
- Expression
- Hands
- Idle
- Sleeping
- Scared
- General
- Vehicle Animations
- Custom
Each category contains pre-built animations designed for specific actions and behaviors.
Users can:
- Browse animation categories
- Preview available animations
- Apply animations to the selected asset
- Combine multiple animations
- Create and manage custom animations
Custom Animations
Section titled “Custom Animations”The Custom category displays animations created by the user.
Only custom animations associated with the currently selected character, vehicle, or pose will appear in the Custom category.
For example:
- Character custom animations are visible only for that character.
- Vehicle custom animations are visible only for that vehicle.
- Pose-specific custom animations are visible only when the corresponding pose is selected.
This ensures users only see animations that are compatible with the currently selected asset.
Layers
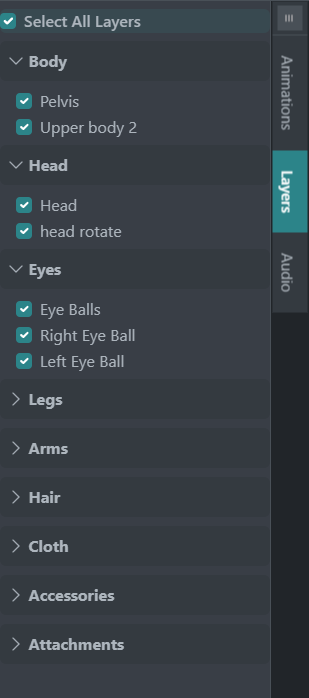
Section titled “Layers”The Layers tab displays all editable layers, bones, slots, attachments, and rig components available for the selected asset.
The contents of the Layers panel change dynamically depending on the selected character or vehicle.
Examples for character assets include:
- Body
- Head
- Eyes
- Mouth
- Arms
- Legs
- Hair
- Clothing
- Accessories
- Attachments

Examples for vehicle assets include:
- Front Glass
- Back Glass
- Windshield Wiper
- Head Light
- Left Indicator
- Right Indicator
- Wheel
- Vehicle Attachments
Users can:
- Select individual layers
- Select multiple layers
- Expand and collapse layer groups
- Access editable bones
- Control attachments
- Create custom animations
The Layers panel provides direct access to all editable parts of the selected asset.
Select All Layers
Section titled “Select All Layers”The Select All Layers option automatically selects all available editable layers and bones for the currently selected asset.
This feature is useful when:
- Reviewing the complete rig structure
- Managing large characters
- Managing complex vehicles
- Quickly viewing all editable components
Once enabled, all available layers become visible and accessible for editing.
Users can then select a specific bone, slot, or attachment and apply animation changes as needed.
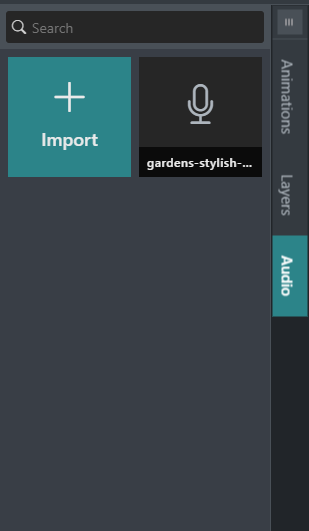
The Audio tab allows users to add, preview, and synchronize audio with animations.
Audio can be added from:
- My Assets
- Previously uploaded audio files
- Voiceover recordings
- Narration tracks
- Sound effects
- Background music
Supported formats include:
- MP3
- WAV
Users can:
- Import audio into FK Animation
- Select audio from My Assets
- Preview audio before use
- Synchronize speech with animation
- Create lip-sync animations
- Align gestures with dialogue timing
Adding Audio from My Assets
Section titled “Adding Audio from My Assets”Audio files stored inside My Assets → MP3 / WAV can be used directly inside FK Animation.
To use audio:
- Open the Audio tab.
- Select an audio file.
- Load the audio into the workspace.
- Preview the audio.
- Synchronize animation timing with the audio.
This allows audio assets to be reused across multiple projects without re-uploading files.
Voice Timing Editor
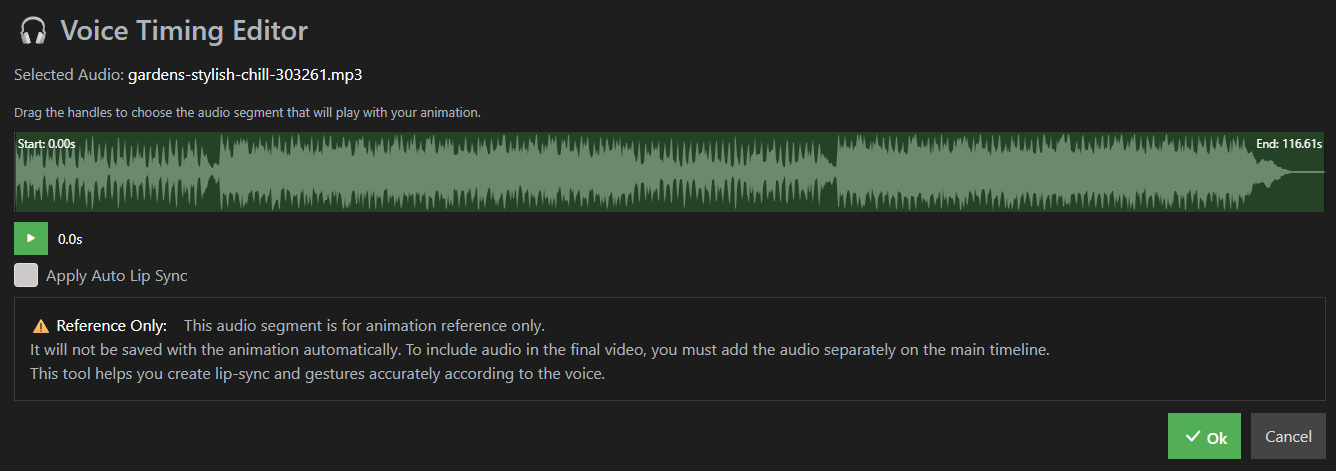
Section titled “Voice Timing Editor”When audio is selected, the Voice Timing Editor allows users to synchronize animation timing with speech.
The editor provides:
- Audio waveform visualization
- Playback controls
- Audio duration information
- Start and end markers
- Lip-sync options
Users can drag the waveform handles to select the exact audio segment used during animation creation.
This helps animators create more accurate dialogue timing and character performance.
Auto Lip Sync
Section titled “Auto Lip Sync”The Apply Auto Lip Sync option automatically generates lip-sync information from the selected audio segment.
When enabled:
- Speech timing is analyzed automatically
- Mouth animation is generated
- Lip-sync data is applied to supported character rigs
- Manual lip-sync work is reduced
This helps accelerate dialogue animation workflows.
Audio Reference Mode
Section titled “Audio Reference Mode”Audio used inside FK Animation serves as animation reference audio.
Important:
- Audio timing is used during animation creation.
- Reference audio is not automatically added to the final project timeline.
- Audio must be added separately on the main Animator timeline if it should be included in the final exported video.
This workflow provides accurate animation timing while allowing independent audio management.
Dynamic Asset Behavior
Section titled “Dynamic Asset Behavior”FK Animation automatically adapts to the selected asset.
Available functionality depends on whether the user is animating:
- Human characters
- Vehicles
- Other supported rigged assets
The following elements are generated dynamically:
- Animation categories
- Layers
- Bones
- Slots
- Attachments
- Timeline tracks
- Transform controls
Different assets expose different animation capabilities based on their rig structure.
For example:
Human Characters
Section titled “Human Characters”Human characters may provide:
- Facial controls
- Body controls
- Arm controls
- Leg controls
- Hand controls
- Expression attachments
- Clothing attachments
Vehicles
Section titled “Vehicles”Vehicles may provide:
- Wheel controls
- Wiper controls
- Glass controls
- Indicator controls
- Headlight controls
- Vehicle attachments
Only controls supported by the selected asset are displayed.
Canvas Area
Section titled “Canvas Area”The Canvas Area displays the currently selected character or vehicle.
This workspace is used for posing, editing, and previewing animations.
Users can:
- Select bones
- Select slots
- Select attachments
- Adjust poses
- Preview movement
- Create keyframes
Green control points indicate editable rig controls.
Bone and attachment controls vary depending on the selected asset.

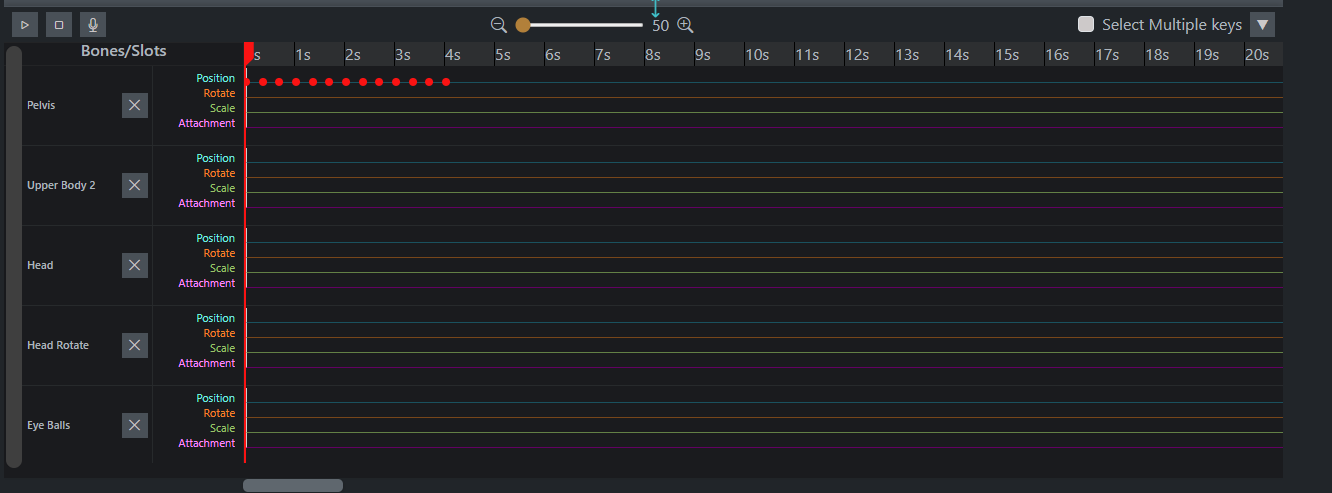
Timeline Behavior
Section titled “Timeline Behavior”The timeline displays animation tracks for the currently selected layer, bone, slot, or attachment.
When a layer is selected, the timeline automatically displays all supported tracks for that element.
Available tracks may include:
- Position
- Rotation
- Scale
- Attachment
Only supported tracks are shown.
Examples include:
- Wheels using rotation animation
- Indicators using attachment switching
- Glass components using position, rotation, scale, or attachment tracks
The timeline automatically updates whenever a different layer is selected.
This allows users to focus on the controls relevant to the currently selected component.
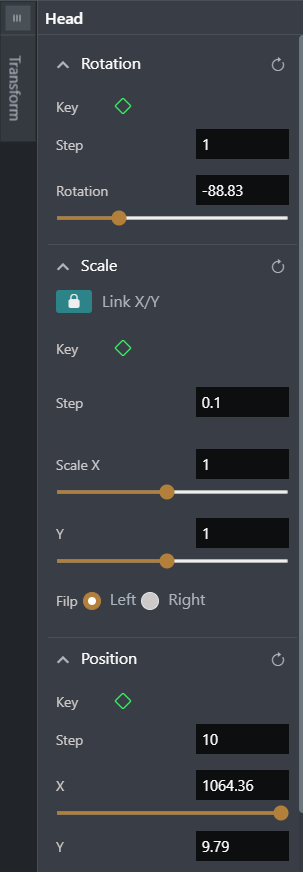
Transform Properties Panel
Section titled “Transform Properties Panel”The Transform Properties Panel displays editing controls for the currently selected layer, bone, slot, or attachment.
Available controls are generated dynamically based on the selected asset and supported properties.
Available transform controls may include:
Rotation
Section titled “Rotation”Controls the rotation angle of the selected element.
Options include:
- Keyframe toggle
- Step value
- Rotation slider
- Rotation input field
Controls object scaling.
Options include:
- Scale X
- Scale Y
- Link X/Y scaling
- Keyframe support
When Link X/Y is enabled, both axes scale proportionally.
Position
Section titled “Position”Controls object position.
Options include:
- X Position
- Y Position
- Step Value
- Keyframe support
Attachment
Section titled “Attachment”Controls attachment switching for supported assets.
Attachment tracks can be used to change:
- Facial expressions
- Vehicle states
- Accessory variations
- Asset-specific attachments
Used to mirror supported objects.
Options include:
- Left
- Right
Not every asset supports every transform type.
For example:
- Wheels may support rotation and position.
- Windshield wipers may primarily support rotation.
- Facial attachments may support attachment switching.
- Character bones may support position, rotation, and scale.
Only valid controls are displayed for the selected layer.
Working with Keyframes
Section titled “Working with Keyframes”Keyframes store transformation values at specific timeline positions.
Supported keyframe types:
- Position Keyframes
- Rotation Keyframes
- Scale Keyframes
Creating a Keyframe
Section titled “Creating a Keyframe”- Select a bone.
- Move the timeline playhead.
- Modify a transform property.
- Enable the key option.
- A keyframe is created automatically.
Timeline Behavior
Section titled “Timeline Behavior”The timeline displays animation tracks for the currently selected layer, bone, slot, or attachment.
When a layer is selected following transform properties become available:
- Position
- Rotation
- Scale
- Attachment slot when supported
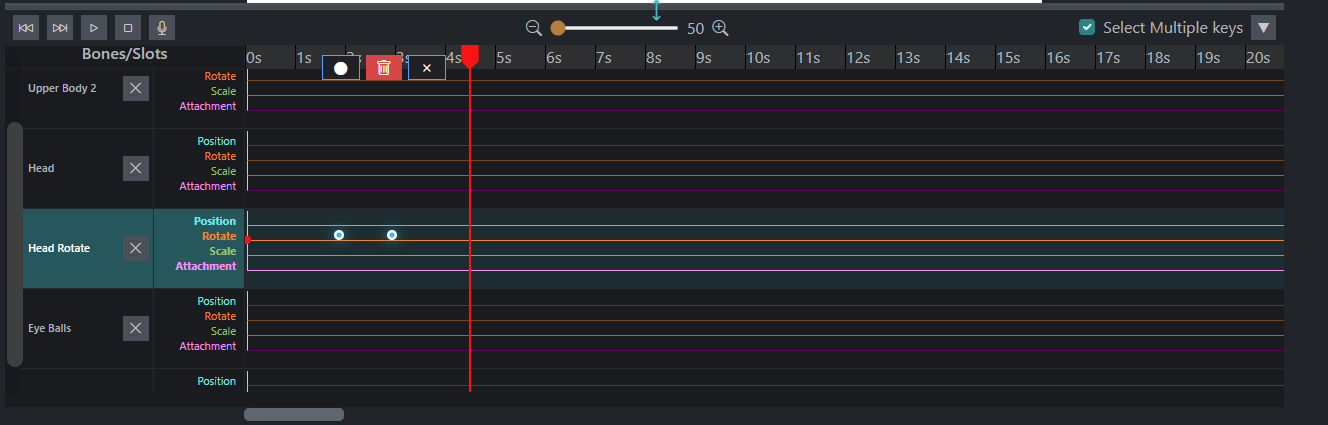
Multiple Key Selection
Section titled “Multiple Key Selection”Users can select multiple keyframes simultaneously.
Benefits:
- Move multiple keys together.
- Delete multiple keys.
- Adjust timing of multiple keys.
- Organize animation sequences faster.
Enable the Select Multiple Keys option above the timeline.
Layer Selection
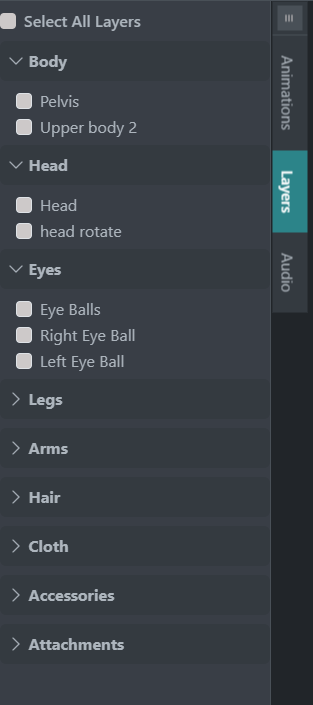
Section titled “Layer Selection”Select All Layers
Section titled “Select All Layers”Users can select all character layers from the Layers panel.
Useful when:
- Applying global changes
- Reviewing rig structure
- Managing large characters
Deselect All Layers
Section titled “Deselect All Layers”Users can also deselect all layers to focus on specific body parts.
Reset Function
Section titled “Reset Function”The Reset button restores the selected animation to its default state.
Use Reset when:
- Incorrect modifications have been made.
- A pose needs to be restored.
- Testing different animation variations.
Reset only restores the current animation state and does not automatically save changes.
Save Function
Section titled “Save Function”After editing an FK animation:
- Click Save.
- The animation changes are stored.
- The updated animation becomes available for future use.
Auto Save Behavior
Section titled “Auto Save Behavior”FK Animation does not support automatic saving.
Users must manually save their work.
Unsaved changes will be lost if the workspace is closed or refreshed.
Custom Animation Restrictions
Section titled “Custom Animation Restrictions”When a Custom Animation is active in the workspace:
- Animation movements cannot be edited.
- Existing keyframes cannot be modified.
- New keyframes cannot be added.
- Bone transformations are locked.
- Timeline editing is disabled.
Users can:
- Preview the animation.
- Apply the animation to a character.
- Use the animation within projects.
Best Practices
Section titled “Best Practices”- Save frequently while animating.
- Use meaningful animation names.
- Organize animations by category.
- Use multiple key selection for faster editing.
- Review poses before exporting.
- Use Reset when testing different movement variations.
- Keep custom animations finalized before applying them to projects.
Summary
Section titled “Summary”FK Animation provides precise control over character motion through keyframes, transform properties, and bone-based editing tools. Users can animate individual body parts using Position, Rotation, Scale, and Attachment tracks while managing layers and timeline data efficiently. Custom animations can be used within projects, but active custom animations remain locked from further editing to preserve animation integrity.
Next Step
Section titled “Next Step”Continue to the next section to learn about:
- Adding props to a scene
- Managing the Props panel
- Positioning and transforming props
- Attaching props to character slots
- Animating props using keyframes
- Organizing prop layers